myspaceprodesigns.com
image mapping
- bookmark us
- add me on myspace
- add me on xuqa
- add me on yfly
Happily Painting Div Layout
author: Uday
10/27/2007 10:14 PM
Re: Link Probs. Please Help!
10/27/2007 07:28 AM
Re: Link Probs. Please Help!
client side image maps
Client Side Image Maps • Server Side Image Maps
An image map is basically a reference to linked areas within a single image.
Client-side maps are great for websites, but not essential for MySpace. If you want to use a client side map on Myspace, the hash mark is filtered, not allowing the map to work in IE or Safari. However, this can be used on XuQa.com.
However, I like to use client side maps so I can use the alt and title tags. The one that's essential for MySpace is the Server-Side Image Map, which you should read about after understanding the client-side image map if you want your map to work on MySpace.
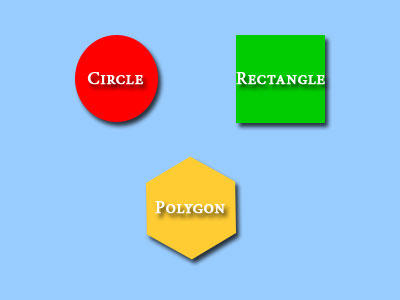
This is an example of one which we will use for our tutorial:

Now, as you can see, if you scroll over the three different shapes, each one is a different link with a title that appears when you mouse over each shape. Let's learn how to make it now.
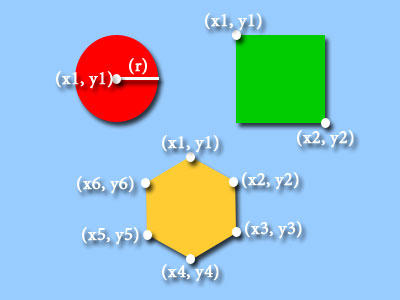
The first thing you need is, of course, an image that you want to use. You then need to find the following coordinates:

If you have photoshop, this is pretty easy. Open your file in Photoshop, then click "Window" in the menu and select "Info" or just fit F8. You want to define this in pixels, so click the little arrow on the top right hand corner of the Info Window and click "Palette Options" and select "Pixels" for Ruler Units. As you move your mouse over the image you are trying to map, you will notice the coordinates appear. Just copy these coordinates and you're all set.
If you don't have Photoshop, you should download Firefox with the Measure It extension. You can use this tool to easily get the coordinates for your picture. Just upload the picture to your host, click on the Measure it tool, and click and drag from the top left hand corner of the image to the point you need the coordinates for. Write these down and you will have the proper coordinates for your map.
Once you have your coordinates, we can start the HTML coding. In order to write the HTML coding, we use the MAP tag, like this:
<MAP name="NAME"></MAP>
We can name it whatever we want to name it and we will reference it later. There are three types of shapes we can make. They are circle, rectangle, and polygon. We add these shapes to our image map by using the AREA tag. There are different attributes to the AREA tag. "Shape" defines the shape, "coords" defines the coordinates of the shape "href" defines the link of the shape. You can also use "alt" to define alternate text, "title" to define the title for the shape, and numerous other HTML tags if you wish to:
<MAP name="NAME">

<AREA shape="SHAPE" coords="XX, XX, XX" href="URL OF LINK" alt="ALTERNATE TEXT" title="TITLE">

</MAP>
rectangle
Let's start with the rectangle. From the diagram above, you can see that we only need to get the x and y coordinates for two points. We use the shape name "RECT" in our HTML to say that we are defining a rectangle. In the code below, also notice the order that the coordinates are put into the code.
<AREA shape="RECT" coords="X1, Y1, X2, Y2"href="URL OF LINK" alt="ALTERNATE TEXT" title="TITLE">
circle
The next shape is the Circle which has the shape name "CIRCLE" and coordinates for X, Y, and radius. It is written in HTML like this:
<AREA shape="CIRCLE" coords="X1, Y1, r"href="URL OF LINK" alt="ALTERNATE TEXT" title="TITLE">
polygon
The third shape we can make is a polygon. This, of course, means that it can be any enclosed shaped of multiple sides. Polygons are great because they don't have to be symmetrical and can take on odd shapes to exactly go around whatever we want to link. The only bad thing about them is that we need to get coordinates for every corner, so the more complex the polygon, the more points we need to get. It uses the shape name "POLYGON" like this:
<AREA shape="POLYGON" coords="X1, Y1, X2, Y2, X3, Y3, X4, Y4, etc." href="URL OF LINK" alt="ALTERNATE TEXT" title="TITLE">
html
Now that we know our shapes, the last thing we need to do is use the term usemap on our image source, the attribute to this is whatever we named our imagemap, like this:
<img src="URL OF PICTURE" usemap="MAP NAME">
So here is the code for our example picture:
<MAP name="clientmap">

<AREA shape="CIRCLE" coords="116, 79, 42" href="/index.html" alt="MySpaceProDesigns Home" title="MySpaceProDesigns Home">

<AREA shape="RECT" coords="237, 36, 325, 122" href="/MPDCodes.html" alt="MySpaceProDesigns Tutorials" title="MySpaceProDesigns Tutorials">

<AREA shape="POLYGON" coords="191, 157, 236, 183, 236, 234, 193, 260, 148, 235, 147, 184" href="http://www.getfirefox.com" alt="Get Firefox" title="Get Firefox">

</MAP>

<img src="/images/Website/imagemap1.jpg" usemap="#clientmap">
Remember, as we said earlier, the hashmark is filtered on MySpace (if you're using this for a MySpace layout). Therefore, leave the hashmark off of #clientmap and the map will work on all browsers except IE. To make it work for IE, let's discuss server-side image maps.
Comments
View Comments (6) • Leave Comment • Support Forum


